What is Jira Automation?
Jira automation is a no-code tool that allows users to create rules automating actions in Jira. Automation is native in Jira Cloud, and in Jira Data Center since version 9.0.
Automation rules have three basic parts:
- Triggers – which tell the rule when to run
- Conditions – an optional element to specify which issues will be impacted by the rule
- Actions – the action you want to automatically execute
Automation rules are project level by default, though Administrators can create global and/or multi-project rules (see the Who Can Create Automation Rules section below). Even in their simplest form, automation rules are powerful tools for streamlining work in Jira.

Common Use Cases for Jira Automation
Harnessing the power of automation can improve your Jira workflows, allow you to integrate Jira custom fields into your processes, and help you set up an awesome service desk.
Common use cases include:
- Creating new issues or subtasks
- Assigning issues
- Synchronizing two related issues
- Editing issue field(s)
- Transitioning an issue
Who Can Create Jira Automation Rules?
Project-level Jira Automation Rules
Most Jira automation rules are project-level and project admins can create rules by navigating to Project settings > Automation > Create rule.
Global Jira Automation Rules
Jira admins can create global rules. To create a global rule, navigate to Jira settings > System > Global automation > Create rule. This page also allows you to see all of the automation rules in your Jira instance.
Multi-project Jira Automation Rules
Jira admins also have the option of creating multi-project rules from the Global automation page. To set the scope of the rule, go to the Rule details. Select Multiple projects in the Scope dropdown and then select the applicable projects.

Advanced Jira Automation - Taking Your Rules to the Next Level
While you can do a whole lot with the basic options and operations, Jira automation also offers advanced functions that expand the possibilities:
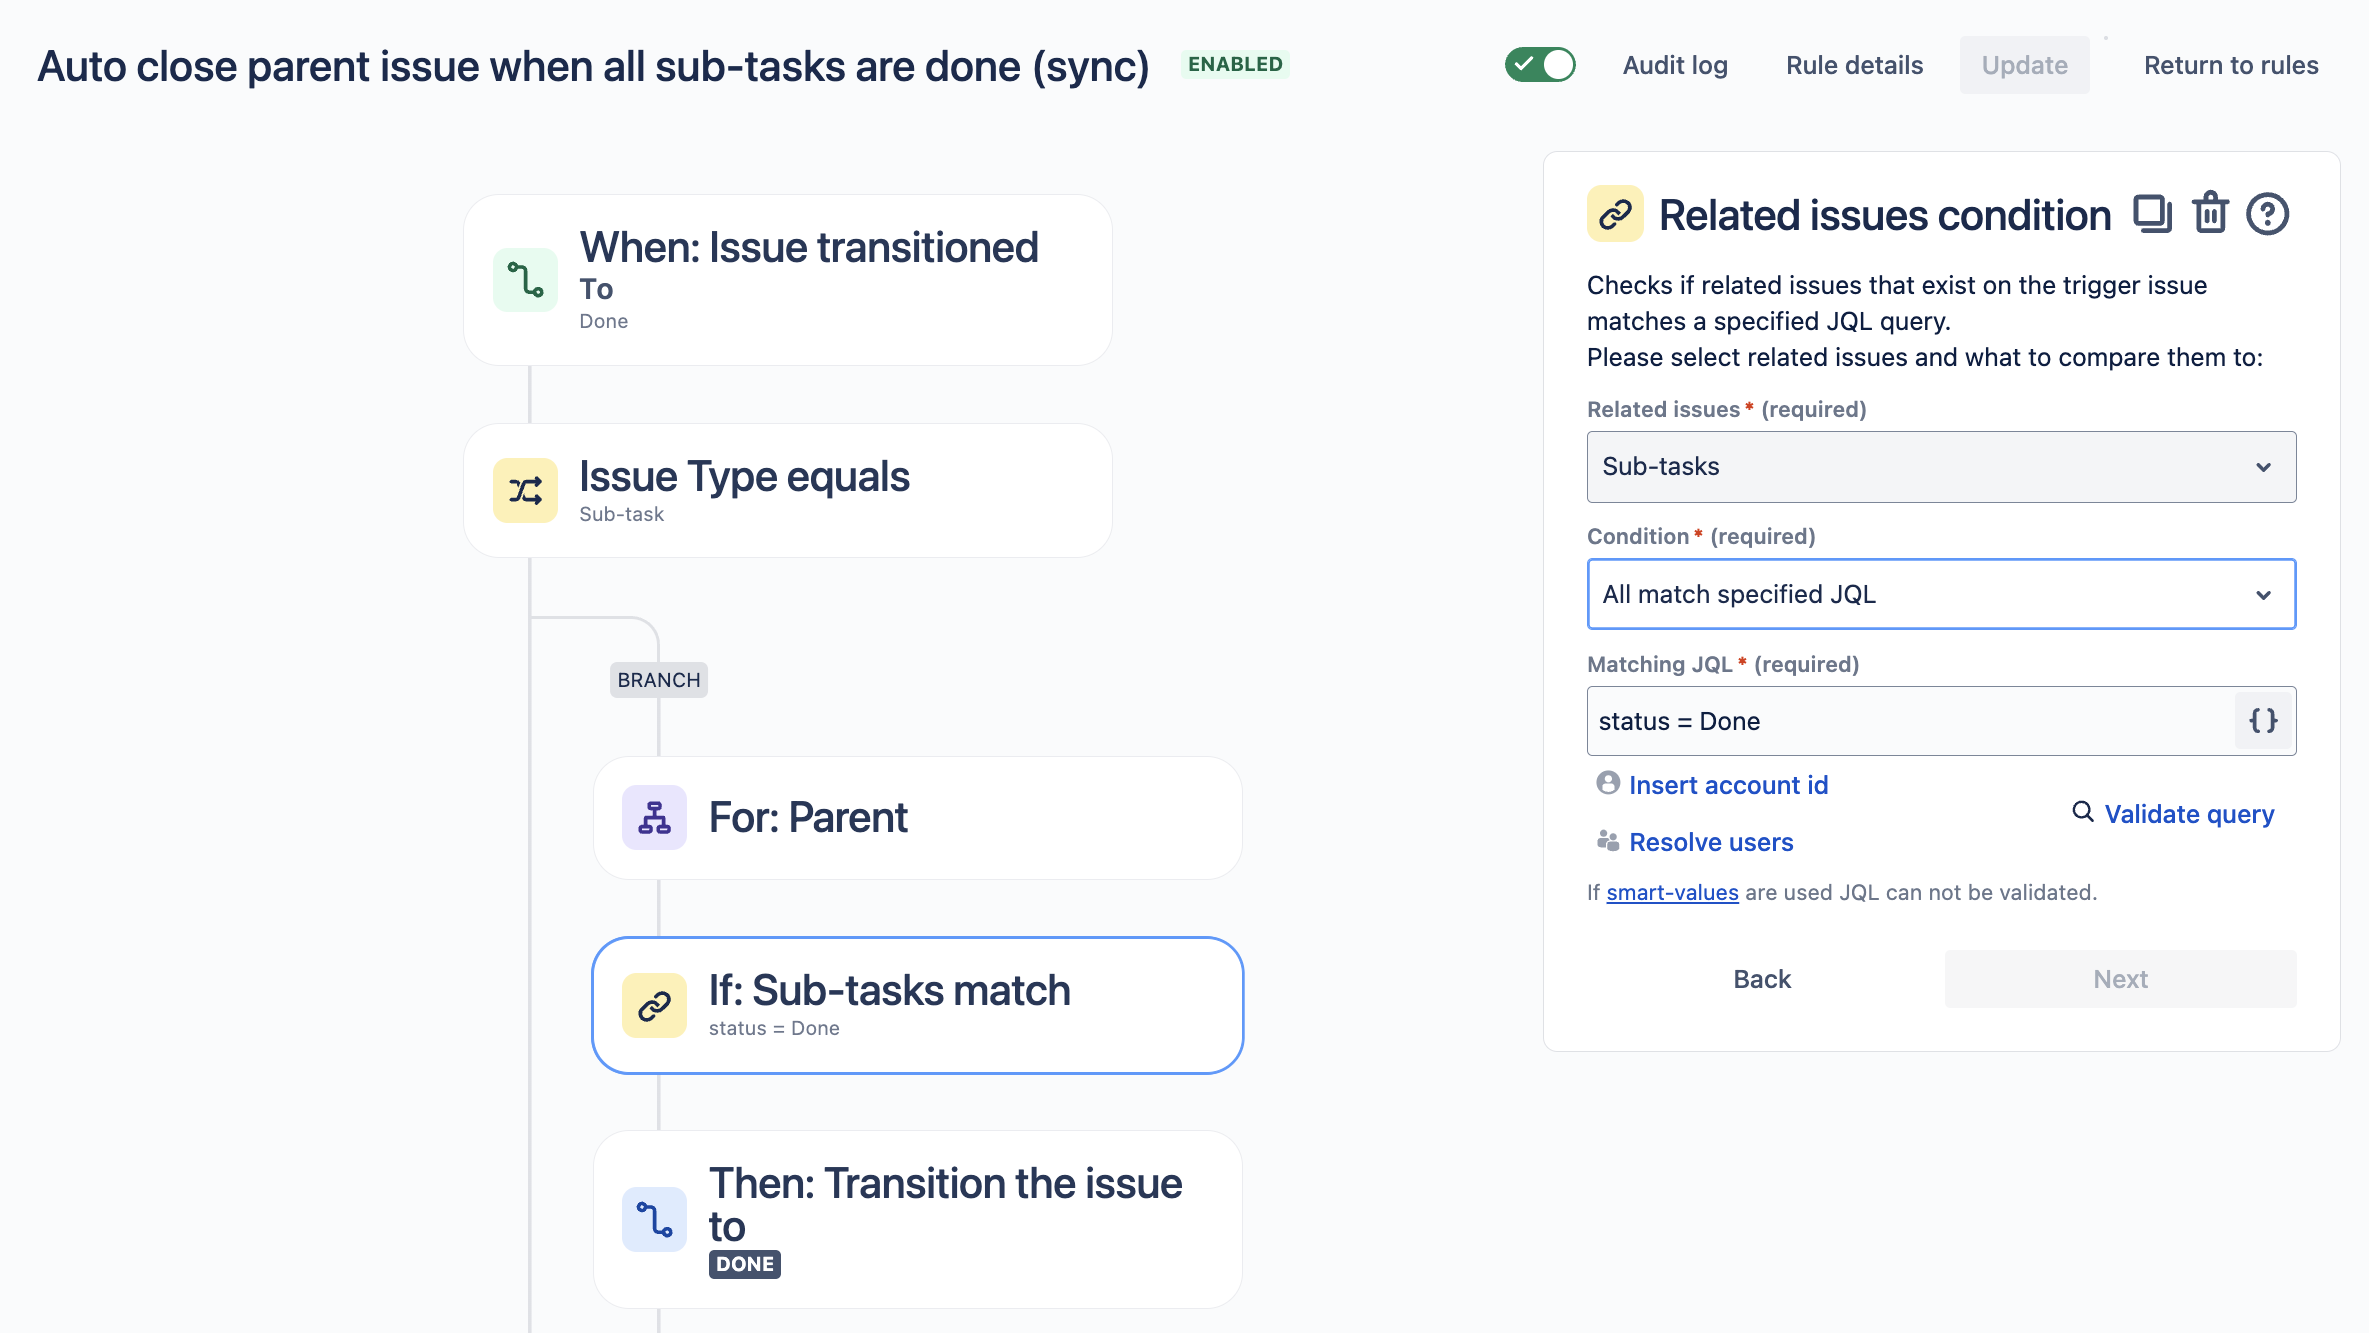
Branching Jira Automation Rules
Along with triggers, conditions and actions, you can also add branching. Branches allow you to add conditions and actions to issues beyond the trigger issue. This is useful for editing issues which were created by the trigger issue, keeping parent and child issues in sync, adding comments to related issues, etc. Branching gives your rule access to:
- Current (trigger) issue
- Subtasks of the current issue
- Parent of the current issue
- Children of the current issue (subtasks or standard issue type)
- Other issues in the same Epic
- Epic
- All issues created by a previous action in the rule
- Most recently created issue by a previous action in the rule
- Linked issues
- Destination issue (when using the Issue linked trigger)
- JQL
- Issues fixed in version
- Issues in the sprint
- Similar issue description
That opens up a lot of possibilities, but if you need more, you can use Advanced branching to perform actions with a smart value. See the Atlassian documentation for advanced uses of branching, such as looping through a JSON array.
Issue Lookups in Jira Automation
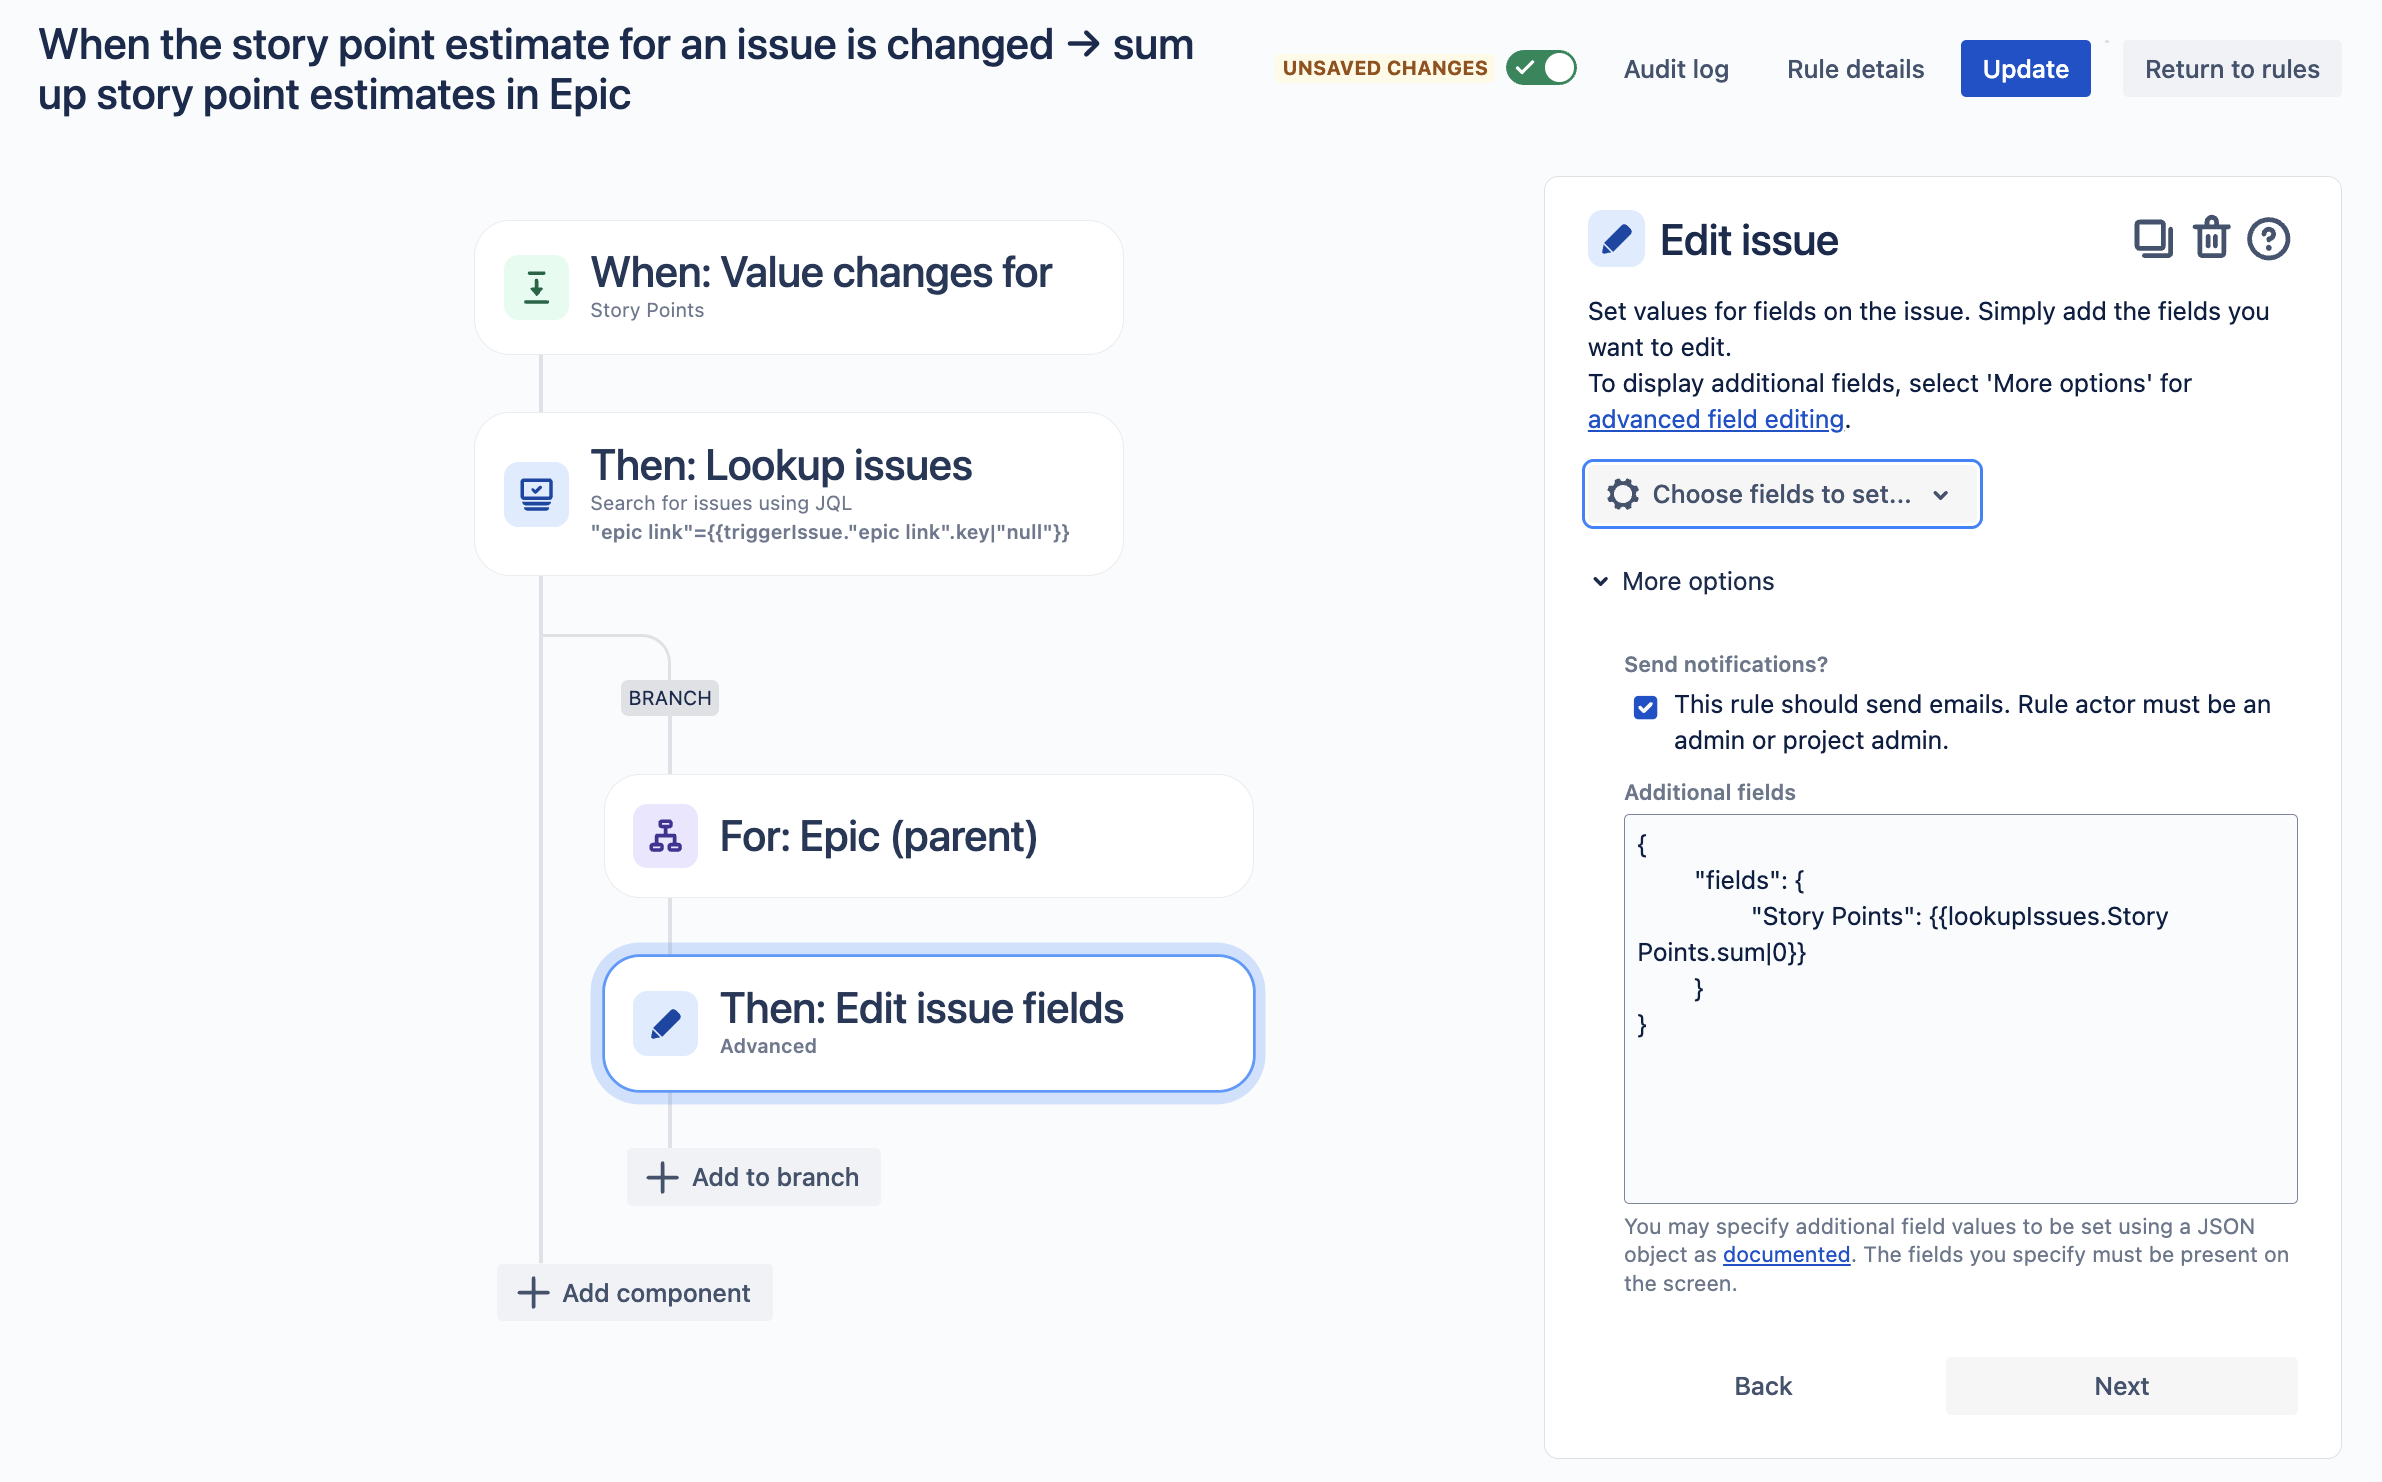
The Lookup issues action allows you to define a list of up to 100 issues using JQL, and then use the {{lookupIssues}} smart value in further actions . For example, you can create an expression with a hashtag # and closed with {{/}} to iterate through the list of issues and perform an action on each of them. Or you can access field data for each issue in the list and use it in a calculation, as in this example which updates the story points for an Epic whenever the story points for one of its child issues is changed.
JSON in Jira Automation
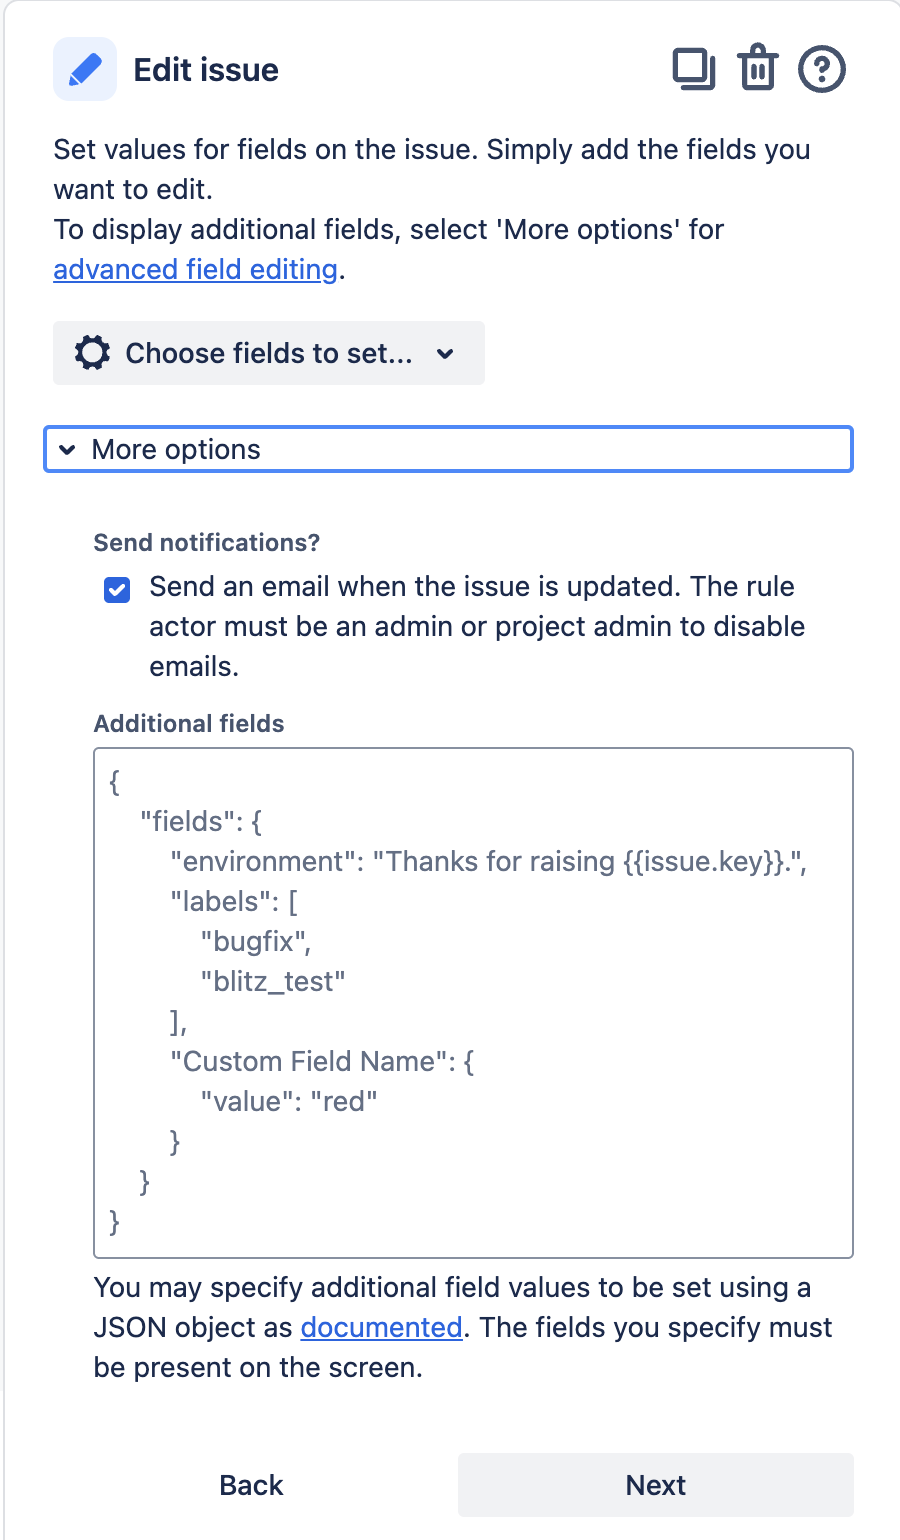
One of the most common actions you’re likely to use in automation is editing an issue. When you select the Edit issue action, you’ll be prompted to select the field(s) to be edited from a dropdown list. If the field you’re editing is a custom field, particularly a custom field created by an app, it may or may not appear in the list. However, if the field is not listed in the dropdown, you can still set its value using JSON.
To set a field value with JSON, click on the More options. The field has placeholder text, so even if you’re not a coder, you can follow the example. See the Atlassian documentation for advanced field editing using JSON for detailed instructions.
RegEx in Jira Automation
RegEx, also known as Regular Expressions or Regexp, is a set of characters that can be used to define search patterns in text. In Jira automation, RegEx is useful in Conditions where you want to search for specific text or text patterns within a larger string. (See the Resources section below for help creating RegEx.)

Of course, automation isn’t the only place where RegEx is useful in Jira. You can also use RegEx in Jira Workflow Validators, Jira Checklists and JQL. (Speaking of JQL, you can use it to define which issues will be impacted by an automation rule. So the better you are at JQL, the better you’ll be at automation.)
Smart Values in Jira Automation
Smart values allow you to access and edit Jira data with automation rules. Most of the smart values you’re likely to use will pertain to an issue, but there are also smart values for accessing project details, users, etc.
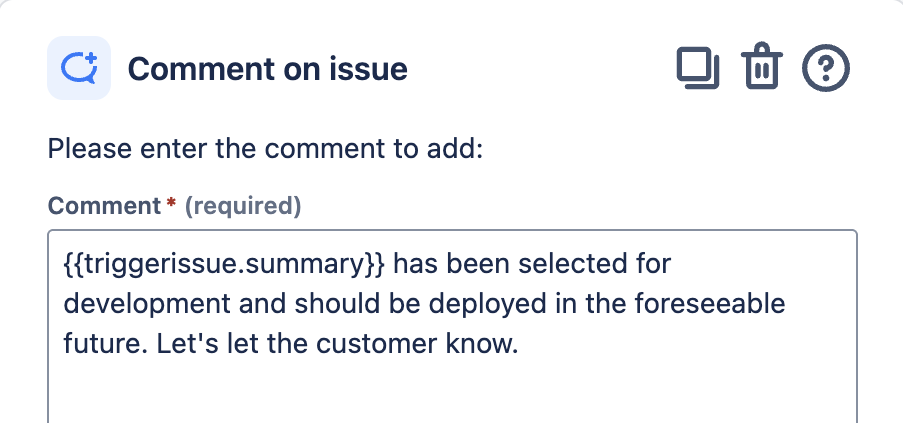
Issue smart values take the form of double curly brackets, “issue.” and the name of the issue property you want to access. So {{issue.key}} returns the issue key and {{issue.summary}} returns the summary.
Smart values are useful in both rule conditions and rule actions. This example, telling the support team that dev issue related to a customer request is now in development, uses a smart value to notify JSM agents so they can let customers know the wait will soon be over:
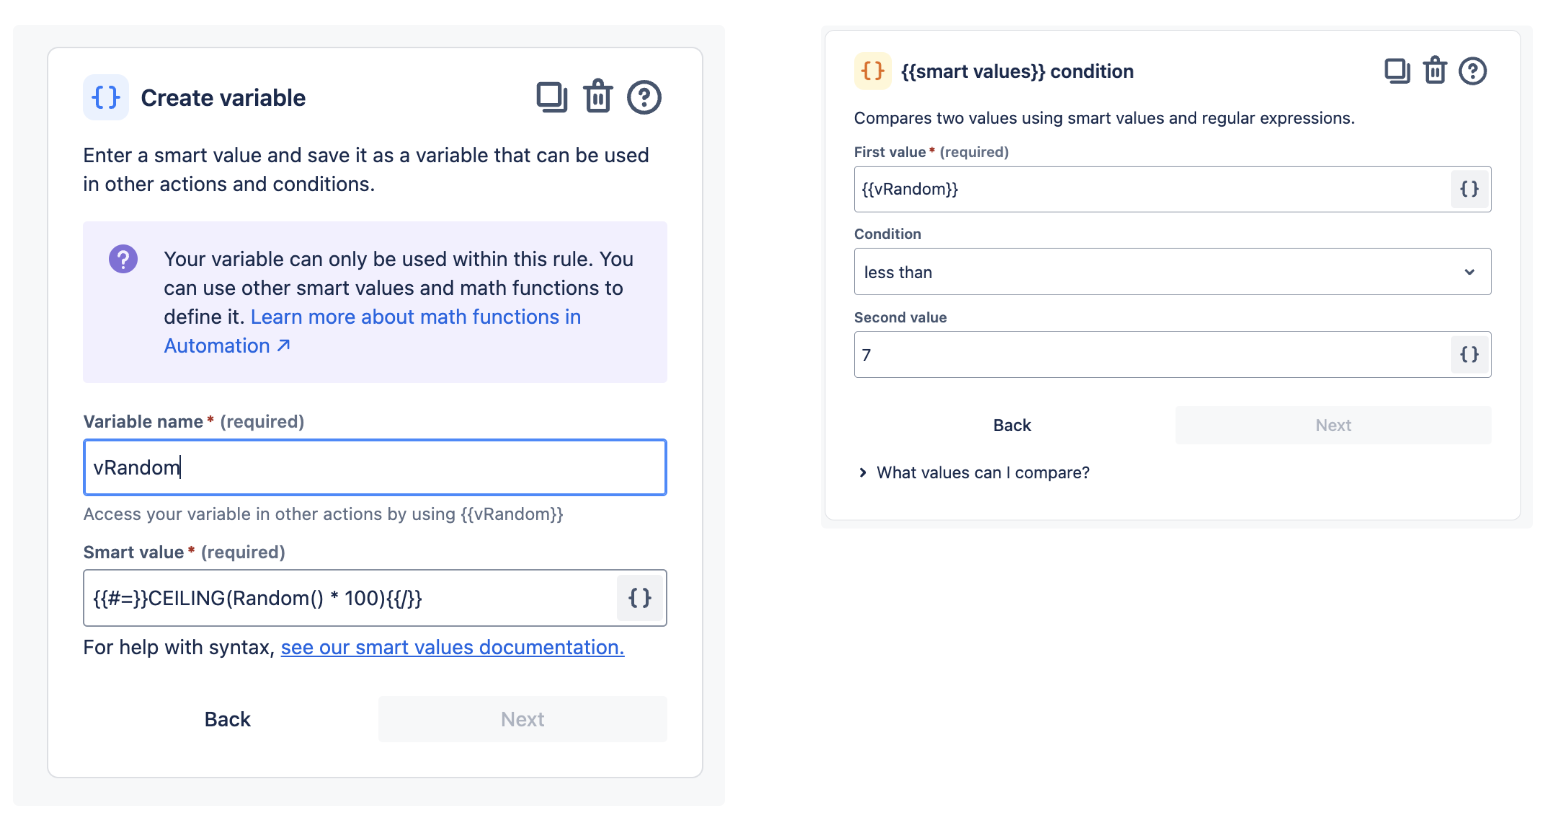
Variables in Jira Automation
Jira automation also lets you define variables which can then be used in an advanced compare conditions, as in this example of an advanced automation rule for Jira Service Management.
Testing Jira Automation Rules
You’ll want to test your automation rules before you turn them on in production. There are several ways you can practice creating, and test your Jira automation rules:
- Test your rules in a non-production environment
- The Jira Automation Playground is a public sandbox where you can view automation templates and recreate them in your own Jira instance.
- If a rule isn’t running when expected, try copying the rule and changing the trigger to Manual. This will allow you to test if the problem is that the rule isn’t being triggered at all, as opposed to a problem with the rule’s conditions or actions.
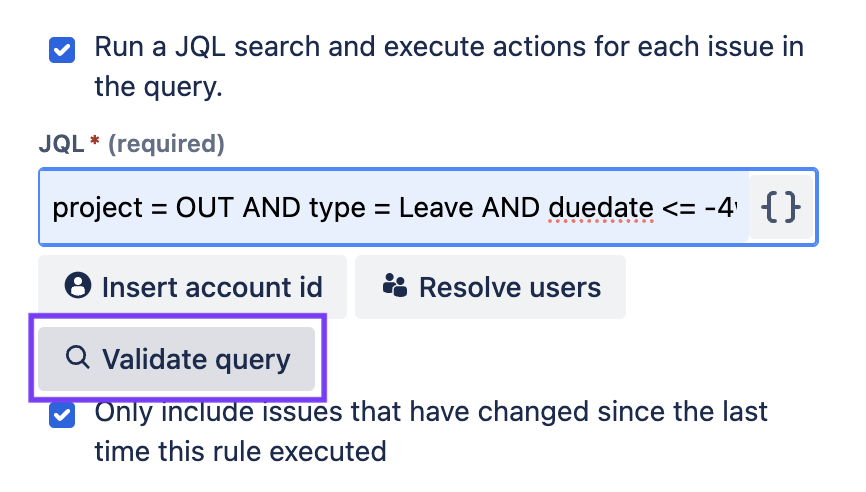
- Test your JQL. If the rule includes a JQL query, test that it’s returning one or more issues. You can do this from within the automation UI (click on Validate query) or by opening the issue navigation page and testing your JQL there.
- To test that your smart values are correct, set up a manually triggered rule and select Log as the action. You’ll be able to see what the smart value returns in the rule’s audit log.
- Make friends with the Audit log. This is one of the best ways to identify the problem when your rules aren’t working as expected.
Jira Automation Limitations
You can do almost anything with Jira automation, but there are a few things you can’t do. One of the things you can’t do is move an issue to another project. Atlassian suggests a clone-and-delete workaround.
There is also a limit of 65 elements (trigger, conditions, actions) that can be included in any one automation rule, and you could run up against this limit more often than you think. Jira will give you a warning and suggest that you split the rule in two – which works just fine.
In November 2023, Atlassian introduced limits on the number of free Automation executions allowed per instance:
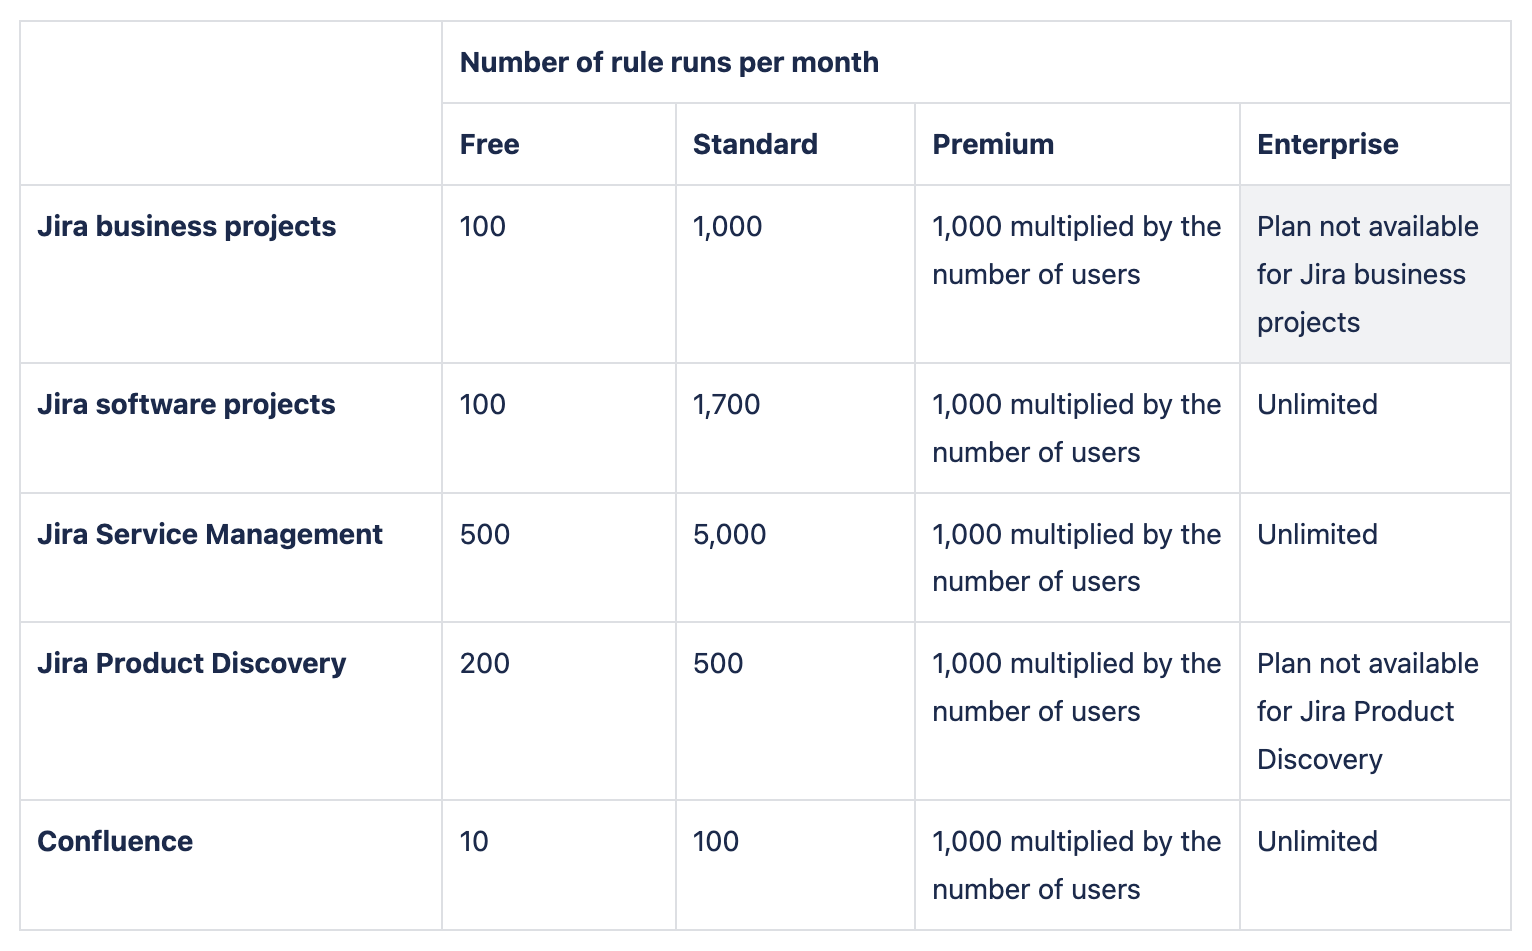
You’ll get a warning when you approach the limit, and when you hit the limit the rules will cease to work. Yes, that’s annoying, but there are a few things you can do to avoid running up against the limit:
- Keep an eye on usage. Admins can navigate to Jira settings > System > Global automation and select the Usage tab. You can see your usage levels, separated by product, and can even see which rules run most frequently.
- Add conditions to your rules to ensure they only execute on the needed issues.
- Disable any unneeded rules. Processes change over time. Review your rules to see if they are still needed.
- Look for another way to achieve the same functionality. You might be able to get the same result with a workflow post function. Or, if your team uses a scripting tool such as ScriptRunner or Power Scripts, you can create a script to do the work of some of your most frequently run rules.
Resources for Learning Jira Automation
There’s always more to learn about Jira automation – here are some helpful resources:
Basic Jira Automation Documentation
Advanced Automation Documentation
Other
One final warning: Once you start using Jira automation you might find that building rules is kind of fun. You’ll want to automate everything!


